PRICING
- Laminate & Carpet 3’3″ x 50′(162 sq. ft.) / 1m x 15m $116.64
- Laminate & Carpet 3’7″ x 65’6″ (237 sq. ft.) / 1.10m x 20m $170.64
- Laminate & Carpet 6’7″ x 50′ (324 sq. ft.) / 2m x 15m $233.28
- Subfloor Tape$11.50
SHIPPING
Standard Shipping: 3 – 7 Business Days
All shipping times are estimated and may not be 100% accurate. Shipping times may vary based on location and order size. Most orders are shipped within the next business day.
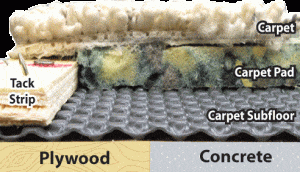
Permanent moisture barrier subfloor
- Stops substrate moisture from absorbing into underlay, carpet, and wood.
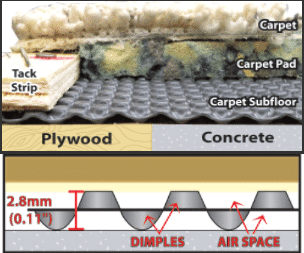
- Adds a thermal break and dual air gap, allowing the flooring material and the substrate to ventilate and stay dry.
- It is 10x faster and 10% of the weight of plywood type subfloors.
- It is easy to cut and is very flexible.
- When installing carpet tack strips, the strips can be nailed through the membrane.
- The membrane is extremely strong and will not crush if you decide to frame over it.
- The unique profile allows the user to install it without removing existing baseboards or cutting door frames.
- Non Lead bearing walls can be built directly on top of the membrane.
- No need to change subfloors with different flooring products.
- Installation of the subfloor is very easy and takes very little time.


Laminate & Carpet Installation Instructions
INSTALLATION STEPS
- Acclimatize the roll (12-24 hours)
- Sweep up all loose debris.
- Ensure your floor is flat prior to installation.
- Fill any low spots with a leveling compound.
- Cut to fit leaving it ¼ inch away from the wall
- Flip the membrane over
- Butt all seams together and tape
- install flooring
Material and tools required:
- Appropriate amount of Superseal Subfloor
- Superseal tape
- Tape Measure
- Standard utility knife
How does the double dimple technology of Laminate & Carpet subfloor work?
The membrane has dimples protruding both ways, leaving an air gap between the floor and the membrane, and membrane and the new flooring material. This provides a dual thermal break just like a two pane window. In addition, the duel air gap allows for both the floor material and the substrate to stay dry.
Can I install it on non-load baring walls?
Non-load baring walls can be framed directly over the product.
How do I secure the membrane to the floor?
You simply unroll the membrane and tape the seams together. You do not fasten it to the floor. Instructions are provided on the roll.
Carpet tack strip can be nailed directly through the membrane into the concrete (Hint: have a few extra tack strip nails handy).
If there is existing tack strips in place you can replace or reuse them. If you choose to re-use them, cut the Superseal subfloor ¼ inch from the tack strips. Using double sided carpet tape in a few spots can help to secure the membrane to the concrete while you are installing the carpet pad.
Gluing the carpet pad down is not required.
Non- load bearing walls can be built directly on top of the membrane. This provides airflow under the wall and throughout the entire floor area and elevates the wood off the concrete.
Flooring transitions can be done directly on top of the membrane if you plan on changing the type of flooring from one room to the next.
A plywood subfloor is NOT required. If you do want to add plywood it can be installed directly on Superseal membrane. A 5/8 inch or ¾ inch tongue and groove is recommended. Glue any joints with a standard construction adhesive. It can be a floating system or you can mechanically fasten it with concrete fasteners or tapcon screws.
INSTALLATION STEPS
- Acclimatize the roll (12-24 hours)
- Sweep up all loose debris.
- Ensure your floor is flat prior to installation.
- Fill any low spots with a leveling compound.
- Cut to fit leaving it ¼ inch away from the wall
- Flip the membrane over
- Butt all seams together and tape
- Nail tack strip down
- Install carpet pad
- Install carpet
A foam underlayment on top of the membrane is not mandatory for laminate or Engineered flooring. However, it is recommended as it will soften the walk, keep the floor a bit warmer, and be quieter against footfall noise. Even the thin, cost effective foam at the flooring store will help. A more dense foam will enhance the floor even more. Some laminates already have foam attached so an underlayment is not required.
Non- load bearing walls can be built directly on top of the membrane. This provides airflow under the wall and throughout the entire floor area and elevates the wood framing off the concrete.
Flooring transitions can be done directly on top of the membrane if you plan on changing flooring products from one room to the next.
A plywood subfloor is NOT required. If you do want to add plywood it can be installed directly on Superseal membrane. A 5/8 inch or ¾ inch tongue and groove is recommended. Glue any joints with a standard construction adhesive. It can be a floating system or you can mechanically fasten it with concrete fasteners or tapcon screws.
INSTALLATION STEPS
- Acclimatize the roll (12-24 hours)
- Sweep up all loose debris.
- Ensure your floor is flat prior to installation.
- Fill any low spots with a leveling compound.
- Cut to fit leaving it ¼ inch away from the wall
- Flip the membrane over
- Butt all seams together and tape
- Nail tack strip down
- install underlayment
- Install laminate or engineered flooring
Any click together vinyl plank can be used with out a plywood subfloor.
A plywood subfloor is required for peel & stick, self adhesive, sheet vinyl, and linoleum flooring. The plywood subfloor can be installed directly on Superseal membrane. A 5/8 inch or ¾ inch tongue and groove is recommended. Glue any joints with a standard construction adhesive. It can be a floating system or you can mechanically fasten it with concrete fasteners or tapcon screws.
Non- load bearing walls can be built directly on top of the membrane. This provides airflow under the wall and throughout the entire floor area and elevates the wood framing off the concrete.
Flooring transitions can be done directly on top of the membrane if you plan on changing flooring products from one room to the next.


